Table of Content
You can also pull it out slightly at an angle away from your head. To make the finished hairstyle look more natural, use a zig-zag shape when you part your hair. The different sections will blend together more easily.
Detangling your hair will allow you to work with it more easily. Good quality hair scissors are key for trimming any hair type. “You don’t need to spend a fortune on hair scissors, but you also don’t want to use blunt scissors,” for example, do not use kitchen or paper scissors. “Think of your hair as being a priceless fabric,” Massey said. Cut the ¼”- ½”section off the bottom of the braid. And FWIW, I’m not just trying to be a bummer or crush your impulsive 11 p.m.
Is it better to trim hair wet or dry?
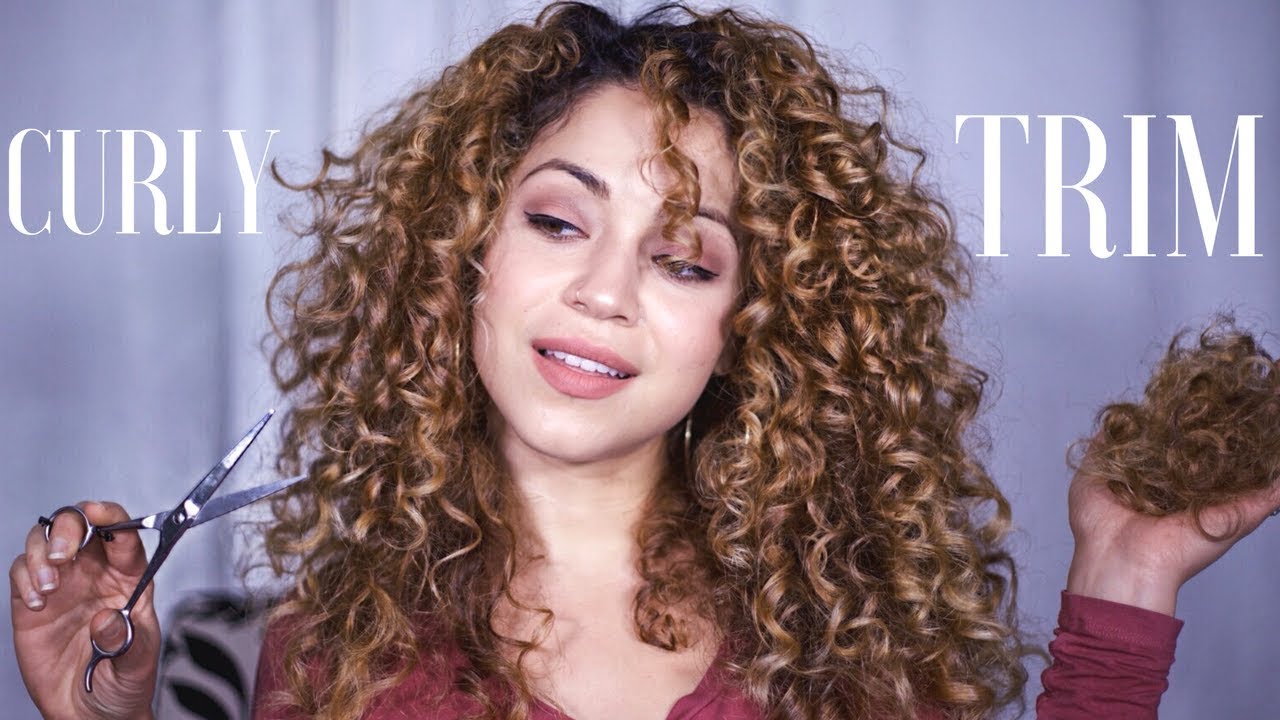
Using a pair of sharp haircutting scissors, trim the ends of each of your curls. Will reminds us that “Dead ends are like fake friends--you can see right through them.” And trimming in twists is a really convenient way to expose those thinning ends. Along with his quick-witted commentary, he demonstrates how and why he trims his natural hair in twists, keeping the process quick and simple. He twists his hair as usual, moisturizing the ends to bring out the curl pattern, cutting no more or less than half an inch to an inch to keep a consistent length throughout.
Also, make sure that you monitor the length of each layer as you cut. If you lose track of the length in each layer, you could end up with an asymmetrical haircut. Committing to DIY bang trims—and this tutorial for straight hair is a great place to start. To trim your hair at home, start by sectioning your hair into at least four sections. Divide your hair in half from ear to ear, tie or pin the top half up, and then section the top half and the bottom half into their own sections with a hair tie, scrunchie, or clip.
Method 3
To cut your own curly hair, try cutting it while it’s styled in your usual way. First, wrap a towel around your neck and shoulders to catch the hair. Place a mirror in front of you and another behind you so you can see all of your head. When you’re ready to start, separate your hair into small sections and cut it 1 section at a time, which helps you control the cuts you make.
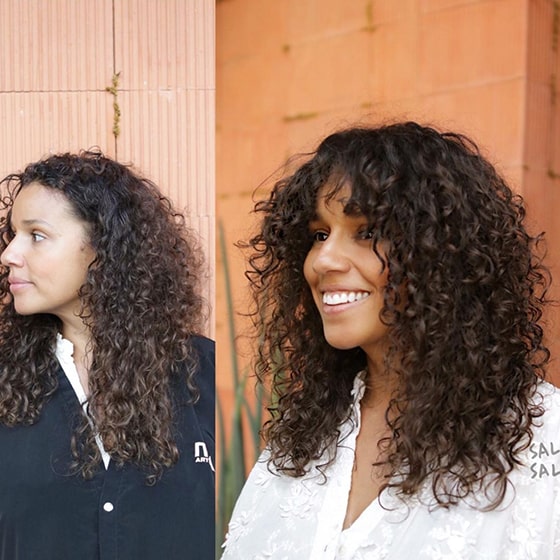
She received her cosmetology degree from the Newberry School of Beauty. Separate the trimmed curls from the untrimmed curls. After you finish trimming the ends of one layer, use a hair clip to separate the trimmed hair from the hair that you have not yet cut. Keeping the trimmed hair separate will help prevent you from cutting the same curls twice. Separate your hair into sections to give you the most control over your cut. Then, using a pair of sharp haircutting scissors, trim the ends of each of your curls.
Layering (The Cut)
Separate your hair into two low pigtails on the sides of your head. Bring the ends of the pigtails in front of your shoulders so that you can see what you are doing. Make sure that you cut straight across and not at an angle. When you are finished, run your fingers through your curls and shake them out. Whether you’re shopping for tea lovers, phone addicts, or cyclists, just because you’re cheap doesn’t mean your holiday presents can’t be awesome.

I-want-new-hair-right-now dreams—I just want you to do what’s best for your hair, k? “A trim is definitely better if you go with a pro,” says hairstylist Kamara Brown Lewis. Plus, “if you mess up, you’ll end up needing a professional—and more than likely, you’ll have to go shorter than you initially wanted,” Thevenot says.
Mini Marley: Trim for a Super Defined Shape
From here, using the piece of hair you already cut as a guide, line your fingers up at a sharp upward angle. I’ve found Manes by Mell to be a great resource for cutting your own curly hair. It’s difficult to do too much damage with a dry cut because you’re only trimming the ends, and you can mostly see the overall shape and look as you cut. I am simply someone with curly hair who has done a lot research and is sharing my own experience.

Make sure to angle your fingers so the layers will be shorter in front and longer in the back. Cut just above your fingers, examine the length, then cut more if necessary. Continue this process with each section of hair until you have the shape and length you want. Cutting curly hair may seem intimidating, but it doesn’t have to be! Whether you want to give yourself a trim to eliminate split ends or go a bit shorter for a new look, there are a few different ways that you can cut your curls.
Throughout the course of this cut, you’ll want to make sure your hair stays wet. I chose this cut because my hair is longer and I wanted to add shape and layering without taking off too much length. The first two or three hair cuts I gave myself were dry cuts. I had no issues with it, and I was always more or less happy with the result. If your haircut looks very uneven or is not what you were expecting, don't try to keep cutting off more and more hair. Make an appointment at a salon and have a professional help you fix it.
Intead, I’d recommend Mell’s varation on the unicorn cut, which is what I’m going to to be breaking down for you in the rest of this post. And while my hair wasn’t as long as it is now, it was also a little too long for this cut. It worked out fine enough, but I wouldn’t recommend if you can successfully gather all of your hair at the crown of your head.
If your hair is unruly, you can mist it with water, but try to avoid getting it too saturated. After spending hours scouring the internet looking for solutions to my own curly hair problems, I found myself wishing for an easier, more comprehensive guide to the most common problems. I expeimented with a few wet cuts and found one I really love. It takes less time and gives me more shape and layering.

Snip with the ends of the shears rather than with the full length of the blade. Then, take your fingers in a straightline at the bottom of your hair and trim the ends. Gather these pieces together and clip them with a small claw clip at the front of your head.
Find a tutorial
After you have separated each section, braid it and secure it with a small elastic hair band. Leave about a 1” tail of unbraided hair at the bottom of the braid. Make sure that there are no tangles and that your hair is ready to be braided.
This will detangle your hair and it won't stretch out the hair as much and will help prevent frizz. Whether or not your curls are short, long, loose or tight, you want to imagine the hair as though it’s on a clock. From the canopy—or top of the head—take a curl and raise it upward so it's in line with the 12 o'clock position on your imaginary clock. “Hold it up as far as its length allows, and place it between your index and middle fingers at the point where you plan to trim. Pull hair forward and carefully snip the end of the hair that is anchored between your fingers with the tip of the scissors. Once you cut that first strand, bring the neighboring strand — which would be 1 o'clock on your imaginary clock — to meet the 12 o'clock strand and snip the end there,” she says.


No comments:
Post a Comment